1 기사 레이아웃
기사(Article) 작성에 Quarto 는 다음 레이아웃을 지원한다.
- 기본 콘텐츠 영역 채우기
- 콘텐츠 영역 넘겨 채우기
- 전체 페이지 채우기
- 문서 여백(margin) 채우기
2 레이아웃 (Layout)
2.1 기본
.column-body 을 기본을 사용하게 된다.
2.2 Body 칼럼
기본 콘텐츠 영역을 살짝 넘겨 콘텐츠를 담을 영역을 넓히고자 할 때는 .column-body-outset을 사용한다.
:::{.column-body-outset}

:::
2.3 전체 페이지
.column-page를 사용하게 되면 전체 페이지 칼럼을 사용하여 콘텐츠를 담는 공간을 넓힐 수 있다.
:::{.column-page}

:::
2.4 표 사례
이미지 뿐만 아니라 R 혹은 파이썬 실행결과 산출되는 그래프와 표도 레이아웃을 확장하여 구현할 수 있다.
::: {.cell .column-page}

```{.r .cell-code}
knitr::kable(
  mtcars[1:6, 1:10]
)
```

::: {.cell-output-display}
|                  |  mpg| cyl| disp|  hp| drat|    wt|  qsec| vs| am| gear|
|:-----------------|----:|---:|----:|---:|----:|-----:|-----:|--:|--:|----:|
|Mazda RX4         | 21.0|   6|  160| 110| 3.90| 2.620| 16.46|  0|  1|    4|
|Mazda RX4 Wag     | 21.0|   6|  160| 110| 3.90| 2.875| 17.02|  0|  1|    4|
|Datsun 710        | 22.8|   4|  108|  93| 3.85| 2.320| 18.61|  1|  1|    4|
|Hornet 4 Drive    | 21.4|   6|  258| 110| 3.08| 3.215| 19.44|  1|  0|    3|
|Hornet Sportabout | 18.7|   8|  360| 175| 3.15| 3.440| 17.02|  0|  0|    3|
|Valiant           | 18.1|   6|  225| 105| 2.76| 3.460| 20.22|  1|  0|    3|
:::
:::| mpg | cyl | disp | hp | drat | wt | qsec | vs | am | gear | |
|---|---|---|---|---|---|---|---|---|---|---|
| Mazda RX4 | 21.0 | 6 | 160 | 110 | 3.90 | 2.620 | 16.46 | 0 | 1 | 4 |
| Mazda RX4 Wag | 21.0 | 6 | 160 | 110 | 3.90 | 2.875 | 17.02 | 0 | 1 | 4 |
| Datsun 710 | 22.8 | 4 | 108 | 93 | 3.85 | 2.320 | 18.61 | 1 | 1 | 4 |
| Hornet 4 Drive | 21.4 | 6 | 258 | 110 | 3.08 | 3.215 | 19.44 | 1 | 0 | 3 |
| Hornet Sportabout | 18.7 | 8 | 360 | 175 | 3.15 | 3.440 | 17.02 | 0 | 0 | 3 |
| Valiant | 18.1 | 6 | 225 | 105 | 2.76 | 3.460 | 20.22 | 1 | 0 | 3 |
2.5 화면 칼럼
.column-screen 을 사용하게 되면 모니터 화면을 가득 채울 수 있다.
::: {.column-screen}

:::
마찬가지로 R 혹은 파이썬 코드에 대해서 동일한 결과를 얻을 수 있다.
::: {.cell .column-screen}
```{.r .cell-code}
library(leaflet)
leaflet() %>%
addTiles() %>% # Add default OpenStreetMap map tiles
addMarkers(lng=174.768, lat=-36.852, popup="The birthplace of R")
```
::: {.cell-output-display}
```{=html}
<div id="htmlwidget-675d70f9f92b69d0db21" style="width:100%;height:464px;" class="leaflet html-widget"></div>
<script type="application/json" data-for="htmlwidget-675d70f9f92b69d0db21">{"x":{"options":{"crs":{"crsClass":"L.CRS.EPSG3857","code":null,"proj4def":null,"projectedBounds":null,"options":{}}},"calls":[{"method":"addTiles","args":["https://{s}.tile.openstreetmap.org/{z}/{x}/{y}.png",null,null,{"minZoom":0,"maxZoom":18,"tileSize":256,"subdomains":"abc","errorTileUrl":"","tms":false,"noWrap":false,"zoomOffset":0,"zoomReverse":false,"opacity":1,"zIndex":1,"detectRetina":false,"attribution":"© <a href=\"https://openstreetmap.org\">OpenStreetMap<\/a> contributors, <a href=\"https://creativecommons.org/licenses/by-sa/2.0/\">CC-BY-SA<\/a>"}]},{"method":"addMarkers","args":[-36.852,174.768,null,null,null,{"interactive":true,"draggable":false,"keyboard":true,"title":"","alt":"","zIndexOffset":0,"opacity":1,"riseOnHover":false,"riseOffset":250},"The birthplace of R",null,null,null,null,{"interactive":false,"permanent":false,"direction":"auto","opacity":1,"offset":[0,0],"textsize":"10px","textOnly":false,"className":"","sticky":true},null]}],"limits":{"lat":[-36.852,-36.852],"lng":[174.768,174.768]}},"evals":[],"jsHooks":[]}</script>
```
:::
:::Code
library(leaflet)
leaflet() %>%
  addTiles() %>%  # Add default OpenStreetMap map tiles
  addMarkers(lng=174.768, lat=-36.852, popup="R 출생지")
2.6 화면 인셋
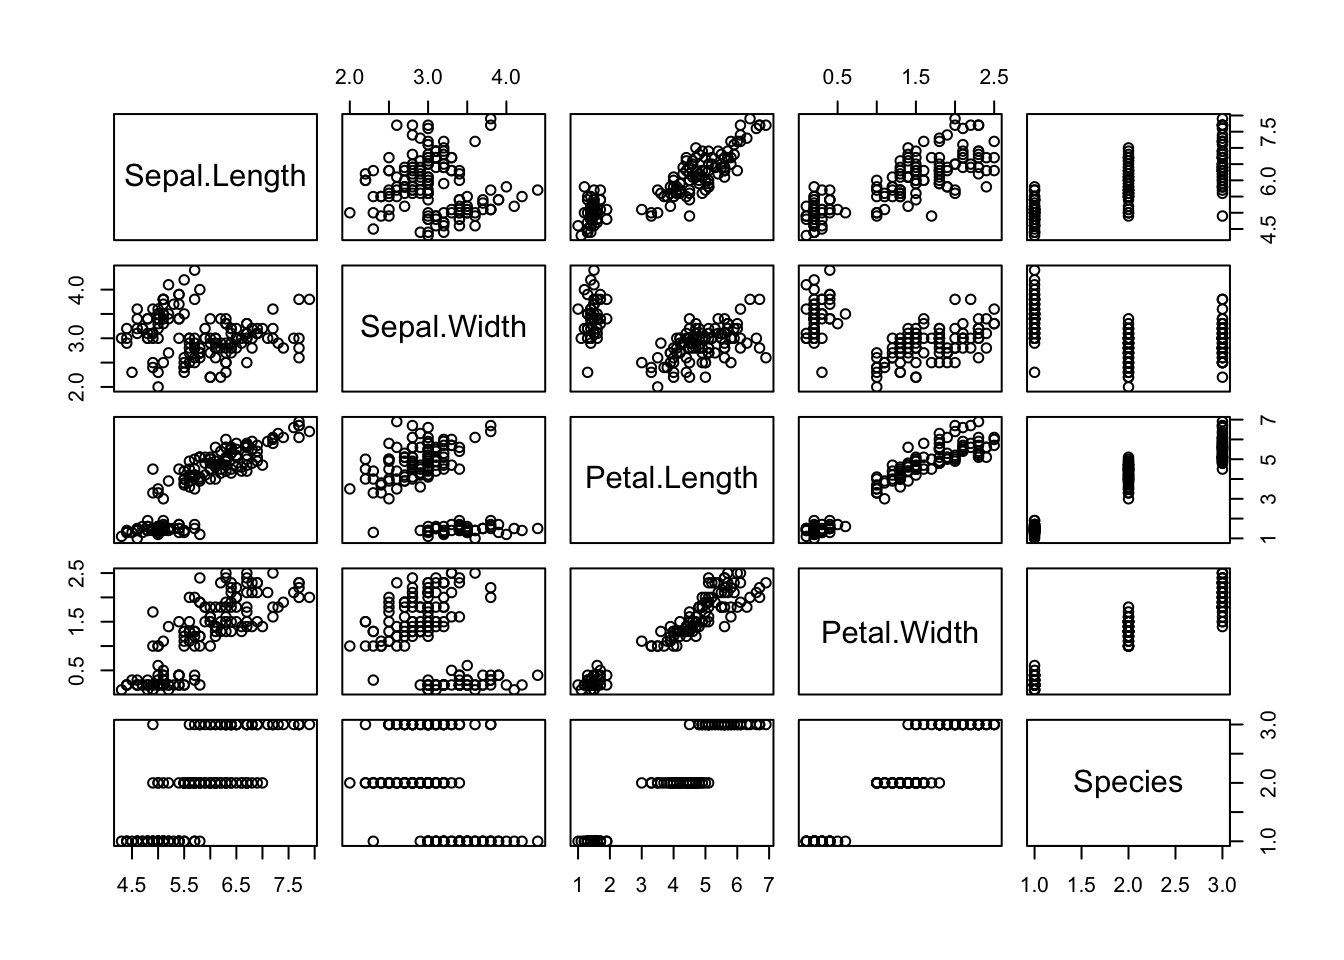
화면 인세(inset)을 사용하여 전체 모니터 화면 전체로 그래프 3개를 넣을 수 있다.
::: {.cell .column-screen-inset-shaded layout-nrow="1"}
```{.r .cell-code}
plot(cars)
```
::: {.cell-output-display}
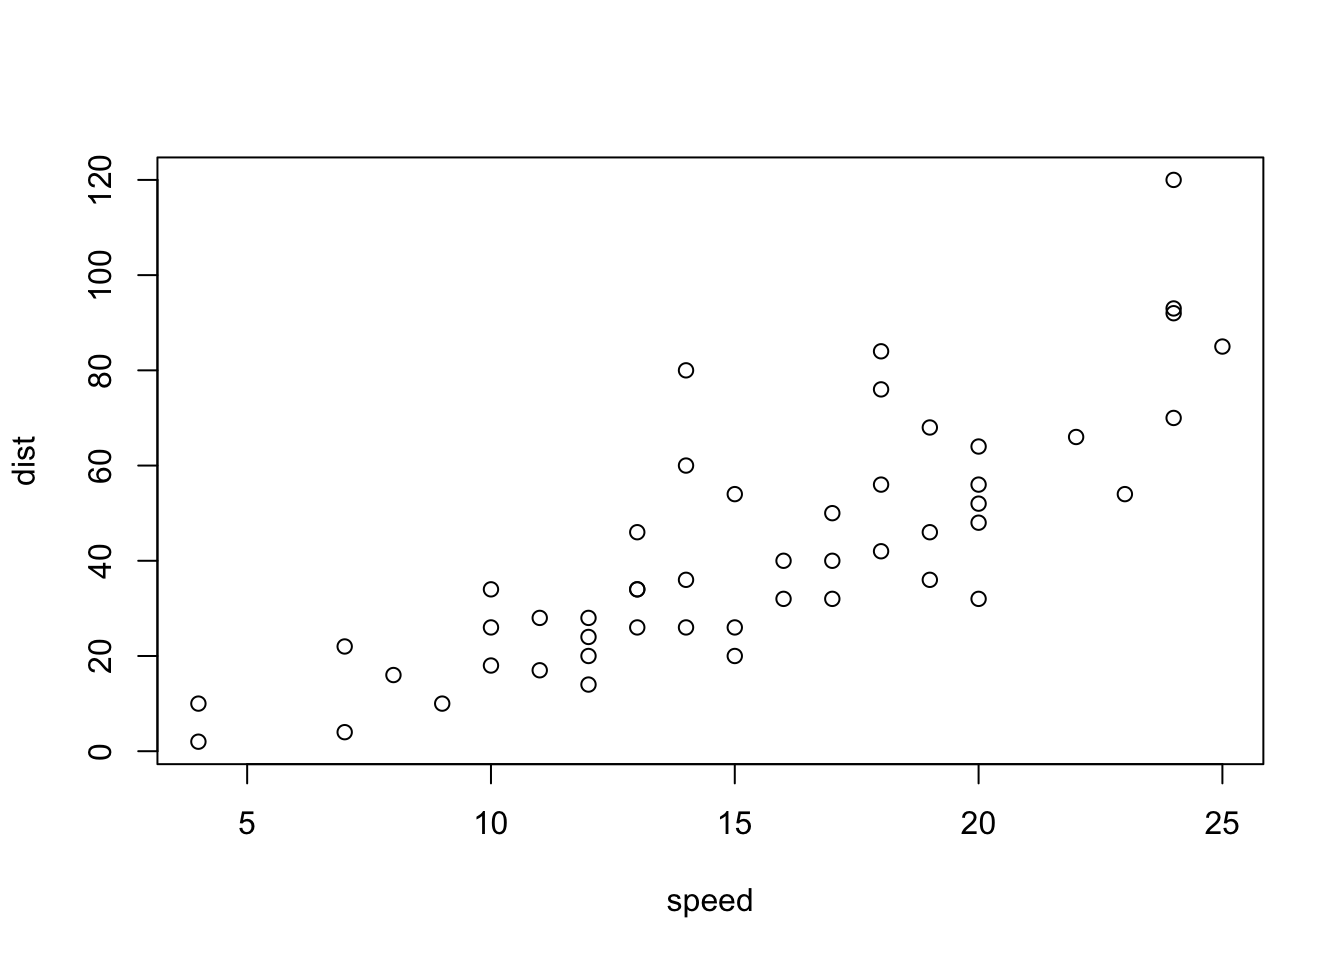{width=672}
:::
```{.r .cell-code}
plot(iris)
```
::: {.cell-output-display}
{width=672}
:::
```{.r .cell-code}
plot(pressure)
```
::: {.cell-output-display}
{width=672}
:::
:::Code
plot(cars)
plot(iris)
plot(pressure)

3 여백 콘텐츠
3.1 여백 이미지
출판에서 유용한 기능 중 하나가 여백에 중요 정보를 기술하는 것이다. .column-margin 클래스를 사용하여 해당 기능을 구현한다.
::: {.column-margin}

:::
3.2 여백 그래프
여백에 ggplot 그래프 객체를 위치시킬 수도 있다.
::: {.cell .column-margin}
```{.r .cell-code}
library(ggplot2)
mtcars2 <- mtcars
mtcars2$am <- factor(
  mtcars$am, labels = c('automatic', 'manual')
)
ggplot(mtcars2, aes(hp, mpg, color = am)) +
  geom_point() +  geom_smooth(formula = y ~ x, method = "loess") +
  theme(legend.position = 'bottom')
```
::: {.cell-output-display}
{#fig-mtcars-margin width=672}
:::
:::Code
library(ggplot2)
mtcars2 <- mtcars
mtcars2$am <- factor(
mtcars$am, labels = c('automatic', 'manual')
)
ggplot(mtcars2, aes(hp, mpg, color = am)) +
geom_point() + geom_smooth(formula = y ~ x, method = "loess") +
theme(legend.position = 'bottom')
3.3 여백 표
마찬가지로 여백에 표를 위치시킬 수도 있다.
::: {.cell .column-margin}

```{.r .cell-code}
knitr::kable(
  mtcars[1:6, 1:3]
)
```

::: {.cell-output-display}
|                  |  mpg| cyl| disp|
|:-----------------|----:|---:|----:|
|Mazda RX4         | 21.0|   6|  160|
|Mazda RX4 Wag     | 21.0|   6|  160|
|Datsun 710        | 22.8|   4|  108|
|Hornet 4 Drive    | 21.4|   6|  258|
|Hornet Sportabout | 18.7|   8|  360|
|Valiant           | 18.1|   6|  225|
:::
:::
Code
knitr::kable(
  mtcars[1:6, 1:3]
)| mpg | cyl | disp | |
|---|---|---|---|
| Mazda RX4 | 21.0 | 6 | 160 |
| Mazda RX4 Wag | 21.0 | 6 | 160 |
| Datsun 710 | 22.8 | 4 | 108 |
| Hornet 4 Drive | 21.4 | 6 | 258 |
| Hornet Sportabout | 18.7 | 8 | 360 |
| Valiant | 18.1 | 6 | 225 |
3.4 수식 등
.column-margin 클래스에 수식을 비롯한 기타 콘텐츠도 반영시킬 수 있다.
::: {.column-margin}
 $[a, b]$ 구간 $x$에 대한 **미적분학의 첫 번째 기본 정리(first fundamental theorem of calculus)** 는 다음과 같다.


$$\frac{d}{dx}\left( \int_{a}^{x} f(u)\,du\right)=f(x).$$


:::
\([a, b]\) 구간 \(x\)에 대한 미적분학의 첫 번째 기본 정리(first fundamental theorem of calculus) 는 다음과 같다.
\[\frac{d}{dx}\left( \int_{a}^{x} f(u)\,du\right)=f(x).\]
4 페이지 나누기
\(\LaTeX\)의 \newpage와 같은 기능을 으로 구현할 수 있다.
page 1


page 2
5 각주 미주등 참조
각주, 미주를 비롯하여 참고문헌 등 다양한 참조를 여백에 바로 표시할 경우 다음과 같이 작성하면 된다. 이와 같이 작성하면 참고문헌 등 관련 정보를 문서 마지막에 위치하는 대신 여백에 바로 표시된다.
---
reference-location: margin
citation-location: margin
---
팔머펭귄 데이터셋은 붓꽃 데이터를 대체하기 위해 몇년에 걸쳐 안정화를 이룬 위대한 데이터셋(Horst et al., 2020)이다. 한국에도 도입이 시급하다.
[This is a span that has the class aside which places it in the margin without a footnote number.]{.aside}
```
`[...]{.aside}`와 같이 텍스트를 넣게 되면 여백에 해당 콘텐츠를 옮길 수가 있다.
[This is a span that has the class aside which places it in the margin without a footnote number.]{.aside}
# 그래프 여백 캡션
R 그래프를 제작한 후에 캡션을 보통 그래프 하단에 붙이게 되나 그래프에 대한 설명을 여백 캡션으로 두고자 하는 경우 `cap-location: margin` 을 R 코드 덩어리 내부에 지정하면 된다.
````verbatim
::: {.cell .caption-margin}
```{.r .cell-code}
library(ggplot2)
mtcars2 <- mtcars
mtcars2$am <- factor(
  mtcars$am, labels = c('automatic', 'manual')
)
ggplot(mtcars2, aes(hp, mpg, color = am)) +
  geom_point() +  geom_smooth(formula = y ~ x, method = "loess") +
  theme(legend.position = 'bottom')
```
::: {.cell-output-display}
{#fig-cap-margin width=672}
:::
:::Code
library(ggplot2)
mtcars2 <- mtcars
mtcars2$am <- factor(
mtcars$am, labels = c('automatic', 'manual')
)
ggplot(mtcars2, aes(hp, mpg, color = am)) +
geom_point() + geom_smooth(formula = y ~ x, method = "loess") +
theme(legend.position = 'bottom')
6 콘텐츠 위치 지정
body, page, screen, outset, inset, right, left 를 달리하여 콘텐츠 레이아웃을 자유자재로 위치시킬 수 있다.
.column-body-outset-right.column-page-inset-right.column-page-right.column-screen-inset-right.column-screen-right.column-body-outset-left.column-page-inset-left.column-page-left.column-screen-inset-left.column-screen-left
.screen-inset-right를 해당 콘텐츠에 지정할 경우 우측 전체 영역에 콘텐츠를 넣을 수 있다.
:::{.screen-inset-right}

:::